In 2025 , Setting up Email on your iMac or MacBook is one of the most important things you’ll do after buying your Mac. Whether it’s for personal or business use, having your email easily accessible helps you stay organized, communicate quickly, and manage your tasks effectively.
Many people assume that setting up email is complicated, especially when dealing with different email providers or manual configurations like IMAP and SMTP. But in reality, macOS makes it quite user-friendly — if you know where to look and what settings to use.
In this Blog ,I will walk you step-by-step through how to set up any email account on your Mac.
Whether you use , Gmail , Outlook , Yahoo , i Cloud , Zoho
Or Any Other Custom Domain You are Using .
Understanding the Basics For Email Setup
Before we dive into the actual setup process, let’s understand the two main ways you can set up email accounts .
- 1.1 Automatic Setup
If your email provider is listed in macOS (like iCloud, Google, Yahoo, Outlook, or Exchange), the setup is almost fully automatic. You just enter your email address and password, and macOS takes care of the rest.
- 1.2 Manual Setup
If your email provider isn’t listed or you have a custom domain (e.g., yourname@yourcompany.com), you’ll need to enter IMAP and SMTP server details manually. This is slightly more technical, but still very do able. Once your account is added successfully, macOS Mail will handle everything else — syncing, receiving, and sending emails.
Now Follow the Process For Email Setup , Step By Step
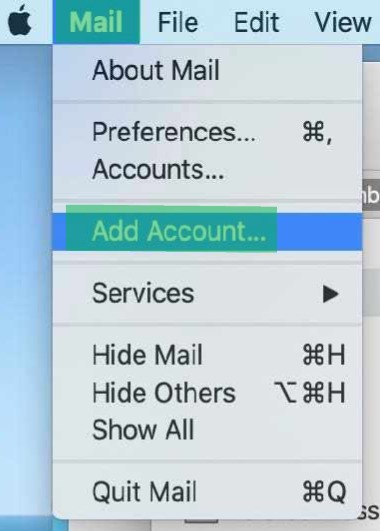
Step 1 : Opening the Mail App
The Mail app comes pre-installed on every Mac.
- Click on the Mail icon in your Dock.
- If you don’t see it, press Command (⌘) + Space to open *Spotlight Search, then type *Mail* and hit Enter.
When you open Mail for the first time, it may immediately prompt you to add an email account.
If Mail is already open but you want to add a new account .
simply ,
Select * Add Account * .
Click * Mail * on the top menu bar.
Alternatively, you can add accounts via :
- System Settings (or System Preferences) > Internet Accounts > Add Account .
Both methods will bring you to the same account setup window.
Step 2 : By Choosing Your Email Provider
MacOS gives you a list of popular email providers. Choose the one you use:
- Other Mail Account
- iCloud
- Microsoft Exchange
- Google (Gmail)
- Yahoo
- Outlook
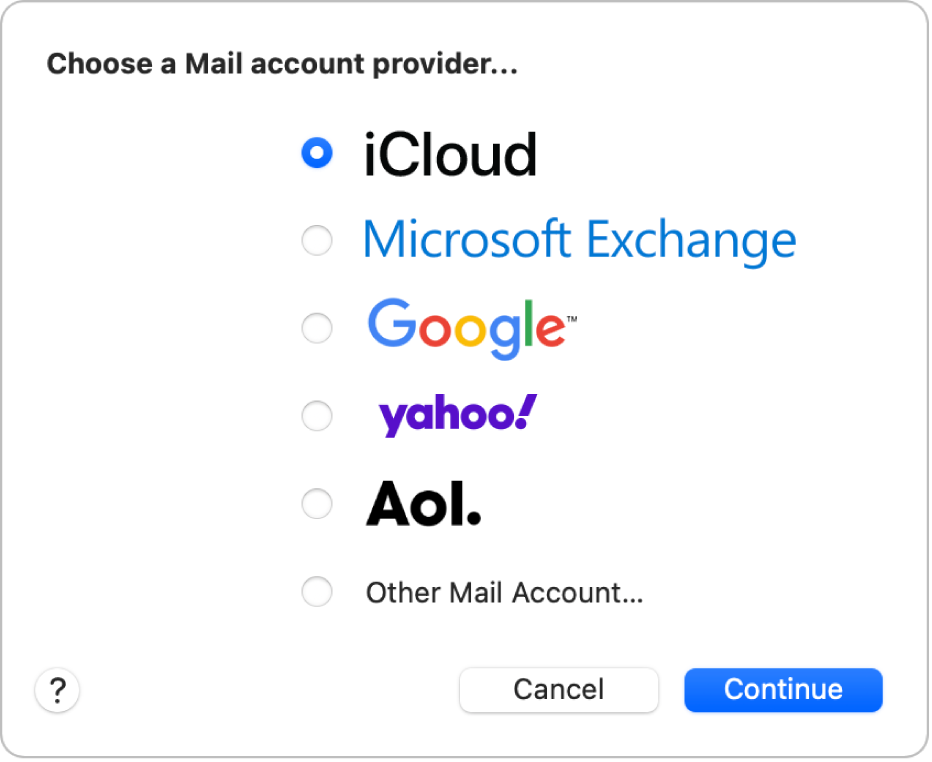
If your provider is not listed, choose * Other Mail Account * — this is where manual setup begins.
Automatic Setup Process ( For Popular Email Providers).
Let’s assume you selected one of the popular providers like Gmail, Yahoo, Outlook, or iCloud. You’ll now be asked for:
- Your Name
- Your Email Address
- Your Password
Sometimes, you may be redirected to your provider’s login page for authentication (especially for Google, Outlook, and Yahoo). This is completely normal.
Once you authenticate:
- macOS will request permission to access your email, calendar, contacts, and notes.
- You can choose which features you want to enable.
- Click Done — your account will be added to Mail.
Done.
Manual Setup Process (For Custom Domains or Non-Listed Providers).
If you select * Other Mail Account *, You’ll need to manually enter your email server information.
Here’s what you’ll be asked:
- Full Name : The name you want others to see when they receive your email.
- Email Address : Full email address (e.g., yourname@yourdomain.com).
- Password : Your email password (or app-specific password, if required).
After this initial step, you’ll be prompted to enter:
- Incoming Mail Server (IMAP) .
- Outgoing Mail Server (SMTP) .
This is where you need your email provider’s server details.
So Let me Also Help You with IMAP & SMTP Server Settings .
Here’s a handy reference table for the most common providers:
| Provider | IMAP Server | Port | SMTP Server | Port |
|---|---|---|---|---|
| Gmail | imap.gmail.com | 993 | smtp.gmail.com | 587 |
| Outlook / Hotmail | outlook.office365.com | 993 | smtp.office365.com | 587 |
| Yahoo | imap.mail.yahoo.com | 993 | smtp.mail.yahoo.com | 465 or 587 |
| iCloud | imap.mail.me.com | 993 | smtp.mail.me.com | 587 |
| Zoho Mail | imap.zoho.com | 993 | smtp.zoho.com | 465 or 587 |
| ProtonMail (Bridge) | 127.0.0.1 | 1143 | 127.0.0.1 | 1025 |
| Custom Domains | (You need to get these from your hosting/email provider) |
Some , Additional Server Settings You Might Need .
When entering your IMAP and SMTP server settings manually, you may also be asked for:
- Username: This is almost always your full email address.
- Password: Your account password or app-specific password.
- Authentication: Always select “Password” or “Normal Password” when prompted.
- SSL/TLS: Always enable SSL/TLS if it asks. This ensures your email is secure.
- IMAP Port: Usually 993 (SSL)
- SMTP Port: Usually 587 (TLS) or 465 (SSL)
Step 3 : Troubleshooting Common Issues
Even with the right settings, you may encounter some common issues:
Can’t Connect to Server
- Double-check server names and ports.
- Verify your username and password are correct.
- Ensure SSL is enabled. 3.2 Password Incorrect
- If you’re using 2FA, make sure you’re using an app password.
- Reset your password and try again if unsure. 3.3 Mail Stuck on “Verifying”
- Sometimes macOS Mail can hang while verifying settings.
- Try quitting the app and adding the account again.
- Restart your Mac if needed. 3.4 Certificate Errors
- If you see certificate warnings, it often means your provider’s SSL certificate doesn’t match.
- You can usually trust the certificate if you are sure you typed everything correctly.
- For business or custom domains, contact your IT provider if you’re unsure.
In Case of Multiple Email Accounts .
You can easily add multiple email accounts to the Mail app:
- Open Mail > Preferences > Accounts (older versions of macOS).
- Or System Settings > Internet Accounts (newer macOS versions).
- Add as many accounts as you like.
All your inboxes will appear together, but you can filter and manage them individually.
There Are Few Advanced Settings in Mail Which Make it Good
After setting up your account, you can fine-tune settings:
- Mailbox Behaviors – choose where drafts, sent, junk, and trash folders are stored.
- Synchronization – choose how often Mail checks for new messages.
- Rules – automate filtering, moving, or deleting emails.
- Notifications – customize alerts for new mail.
Conclusion : Everything is in Control
Setting up email on your iMac or MacBook isn’t as scary as it sounds. Once you understand the basics — the Mail app, IMAP and SMTP servers, your credentials — you can easily add any account you want.
Most of the time, macOS will handle everything automatically if your provider is listed. For custom or business email accounts, having the correct server info ensures smooth setup.
And remember:
- Use IMAP for better syncing across devices.
- Always enable SSL/TLS for security.
- If you get stuck, check for typos, double-check passwords, and verify server settings.
With email properly set up, your Mac becomes an even more powerful tool for both work and personal use.